
Servicestatus
This website contains outdated information and should only be used for self-help in the event of problems with Zoom. We are currently working hard on the introduction of MS Teams as a central application for video conferencing. As soon as the service is fully available, this website will be updated.
Service Overview
|
Eligible: |
(Educational License) Active PSI Account holders |
|
Availability: |
24 Hours , 7 / 7 Days (not operated by PSI) |
|
Support: |
Monday - Friday 8:00 - 17:00 - ServiceNow using Business Service : ” Zoom (Videokonferenzsystem)[CF]” |
Description
Zoom is an online End-To-End encrypted (using AES 256bits encryption and SSL) collaboration and meetings platform providing full HD video and audio conferencing capabilities with content sharing, like files, group messages and screens.
Because the PSI Zoom accounts were configured to use Single Sign-On (SSO) for your Zoom account, SSO will be used to login on the Web and with the Zoom client. For PSI users (holders of a PSI account) no initial registration should be necessary.
Additional participants to a meeting do not need a Zoom account to attend the meeting, i.e. only the host of a meeting needs to hold a Zoom Account.
Noteworthy / Restrictions
- Whenever possible avoid using a VPN connection and try to turn the camera only on when really needed. How to start / stop the video when attending a Zoom meeting is described here.
- Zoom is headquartered in San Jose, California (USA) and despite the fact zoom.us provides data centers located in Frankfurt and Amsterdam, we strongly recommend to follow some simple safety instructions :
- Recording Calls or Meetings, only if necessary and always with the consent of all involved parties. Store data only locally and not via the cloud service itself. How to record locally, is shown here.
- Enable Consent to be Recorded for Zoom Meetings
- Providing its Consent as an attendee
- All directives on information and IT security remain in force. It is the responsibility of all the employees to ensure compliance with the directives. Further information and recommendations are available in the IT Security Regulations (Daily Bulletin No. 7)
- Recording Calls or Meetings, only if necessary and always with the consent of all involved parties. Store data only locally and not via the cloud service itself. How to record locally, is shown here.
- Privacy Concerns with Zoom
- The Attendee Attention tracking, which has come under criticism in the past days and which is used by Zoom to monitor the meeting’s participants attention, has been switched off and permanently disabled in our setup.
- To protect the personal data processed by Zoom and its subcontractors, PSI has signed the required Global Data Processing Addendum which confirms that Zoom adheres to accepted European Data Protection Standards (Swiss-US and EU-US Privacy Shield Framework and Principle). Furthermore, Zoom also complies with the European Union General Data Protection Regulation (“GDPR”). Despite this addendum and GDPR compliance, please do not transmit, upload, or share confidential or particularly sensitive data via the Zoom Platform.
- The signature of the Addendum also guarantees that storage of data happens in data centers mainly in Europe but some might be stored in the US and Australia. Please also keep in mind the other data center locations might store data too, depending on the residence of your meeting host.
- We also urge you to read the instructions concerning the security measures, which have to be followed by all employees listed in this table very carefully.
- Zoom Privacy Policy was updated end march 2020
Key Features
- Host meetings with up to 300 participants (not time limited)
- File / Screen sharing options
- Integrate with Outlook (currently a plugin is required)
- During the conference
- Application / Screen sharing
- Shared Whiteboard
- session recording (see Legal information)
- Chat (E2E encrypt)
- Multilingual user interface (How To change The Language )
Costs
No fee charged for this service (eligible to an Education Licence)
How To Access / Login
- Sign-in over the PSI vanity URL psich.zoom.us
Quick Start Guide
- Navigate and log in to https://psich.zoom.us/signin to activate your PSI Zoom Account. Not needed for PSI Users using a standard PSI Windows system.
- Download the latest Zoom Client for Meetings for your OS from the Zoom Download Center
- Check out our Getting Started With Zoom@PSI guide for more information
- You can even watch some of the Zoom’s tutorial videos
- Try out a Zoom Test Meeting
- If you encounter issues please make sure to also check out the Troubleshooting section or contact the Service Desk
Getting Started With Zoom@PSI
Installation, Registration and starting Zoom
PSI has initially licensed the software with Educational Licenses for one year and thus no prior registration is needed and Single-Sign-On (Switch AAI) as login mechanism.
For best usage, please check the System Requirements for PC, Mac and Linux
Supported browsers for the Web Client usage
- Windows: IE 11+, Edge 12+, Firefox 27+, Chrome 30+
- Mac: Safari 7+, Firefox 27+, Chrome 30+
- Linux: Firefox 27+, Chrome 30+
Desktop Applications (PC, Mac and Linux)
PSI Standard Windows Systems
On PSI standard Windows computers "Zoom" is automatically pre-installed.
- "Zoom" Windows Client is also available for installation in the software kiosk as <Zoom ML>
- Start Zoom using the desktop shortcut “Zoom”

- or click the Windows key
 on your keyboard to open the start menu and type the first letters of “Zoom”. “Zoom” | “Start Zoom” will appear as the first choice in the list. Next press Enter for quickly launching Zoom
 - The Zoom login dialog will now be displayed
- Either attend a meeting or sign in.
Private Computers
For private Windows computers or Mac, Linux computers running a supported OS, links to download the Zoom Client app (PC, Mac,iOS, Android) and the Microsoft Outlook plugin can be found here. To automatically download the latest Zoom version for your OS, please navigate to psich.zoom.us/support/download.
Under Mac and using the Homebrew Package Manager you can install Zoom as
$ brew cask install zoomus
Linux Systems
Information on installing Zoom on linux is described in the Linux Installations Note
For Fedora or RedHat based system (for other linux flavors see the link above) and using the terminal
- download the appropriate RPM file at theZoom Download Center
- In a terminal enter (for 64bits Linux)
$ sudo yum localinstall zoom_x86_64.rpm
Check the “Linux Installations Note” for the required dependencies !
Web Access and Mobile Client
- Check that you meet the System Requirements for PC, Mac and Linux and are running a supported browser
- The Zoom Web client allows joining a Zoom meeting or webinar without requiring the download of any further software. However, the Web client has limited features and works best with Google Chrome
- A complete list of the supported features per browser is available at Zoom Features across browsers
- To access Zoom using the Web Client navigate to psich.zoom.us (PSI Zoom vanity URL)
- Zoom Mobile Apps are available for iOS, iPadOS and Android. Detailed requirements can be found on Zoom’s Mobile System Requirements page.
Log-in With Single Sign On (SSO)
After an initial Zoom login (triggers the account activation), you will be entitled with an Educational License and will be able to host meetings with up to 300 participants without any time restrictions. Please be aware that normal Basic Zoom Accounts are limited to 40 minutes on meetings with three or more total participants.
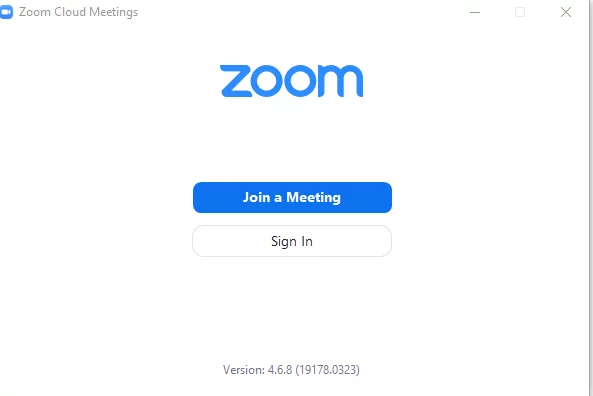
To start using Zoom, you need to activate your PSI Zoom account by visiting the PSI Zoom vanity URL psich.zoom.us and signing in using your PSI login credentials as shown below or use the direct activation link. The Sign-in process is shown in the next picture recorded on a PSI standard Windows system with VPN during Home Office.
When you login with VPN you will have the option to Enable the Auto-Login, an option that will not be available when you are not using a VPN connection and you will have to rely on entering your PSI username and password.
That’s all that is needed to activate the account. If you experience any issues activating your account, contact the PSI Service Desk using Service-Now and choose “Zoom (Videokonferenzsystem)[CF]” as impacted Business Service
Desktop and Mobile Login with SSO (First Time)
When signing in to Zoom using the Desktop or Mobile apps, a few additional steps will be needed to authenticate and activate your account.
If using a private computer or a non-standard PSI system then you need to download the Zoom Desktop Client (Windows,Mac, Linux) manually. On PSI standard systems the Zoom Windows Client will be pre-installed.
Once downloaded, sign into the Zoom desktop client by clicking “Sign In with SSO” as shown below . Use psich.zoom.us as the company domain. Your default Web browser will open and prompt you to enter your PSI Windows login data to complete the authentication. You will then be directed back to the Zoom Client App.
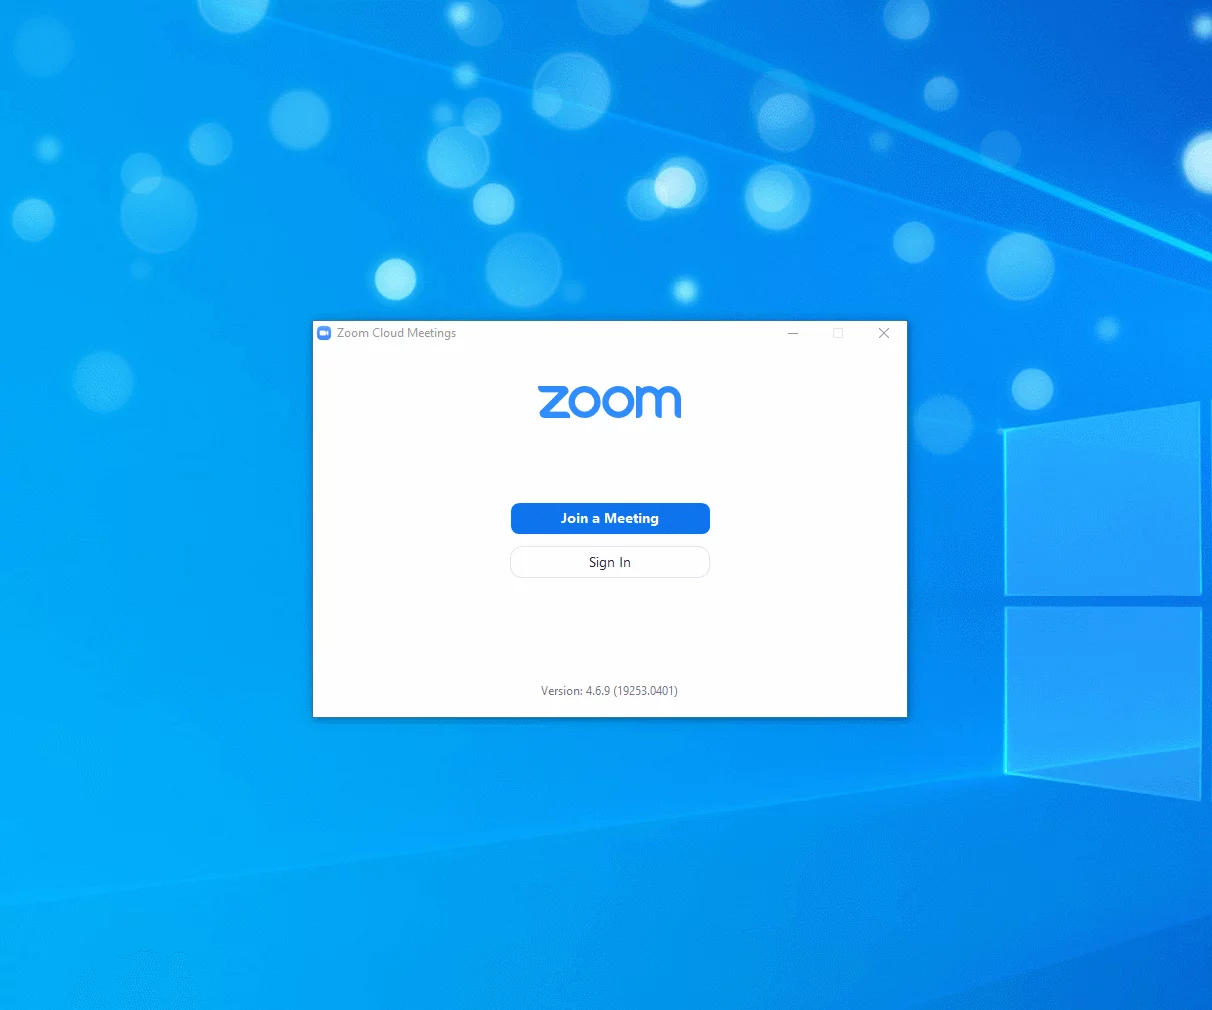
The PSI Windows Client will not offer the possibilities to login with your Facebook or Google Account. Here no Auto-Login option since VPN was not activated.
To “Sign In with SSO” on mobile devices follow the instructions here and use psich.zoom.us as company domain to use SSO on your mobile device.
Zoom Web Client Access
Meeting’s attendee who installed neither the Zoom desktop or mobile app can join a meeting through their Web Browser. It should be noted that the Zoom Web Client exhibits limited functionality. To use the Web browser when joining a meeting, click the “join from your browser” link that appears after an attendee clicked on the link to join a meeting as shown in the next picture (A)
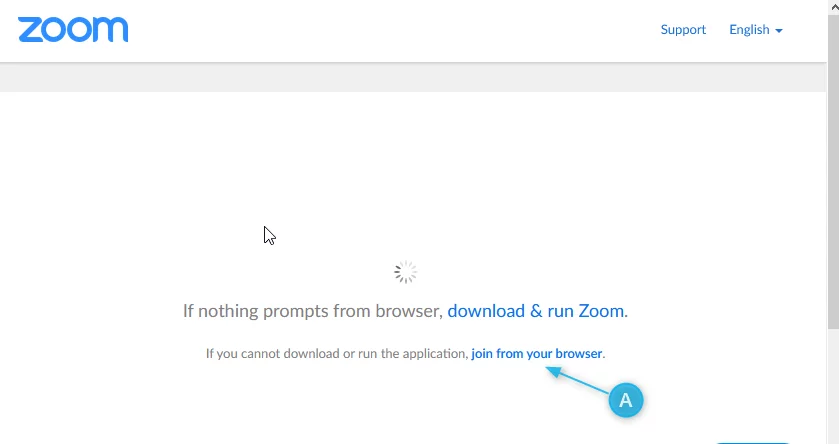
For more information on how to show a “Join from your browser” link in different situations check this Zoom Help Center page. We will not further discuss the Web Client in this “Getting Started” documentation but you can read more about the Web Client in the Help Center.
Short Zoom Desktop Client Tour
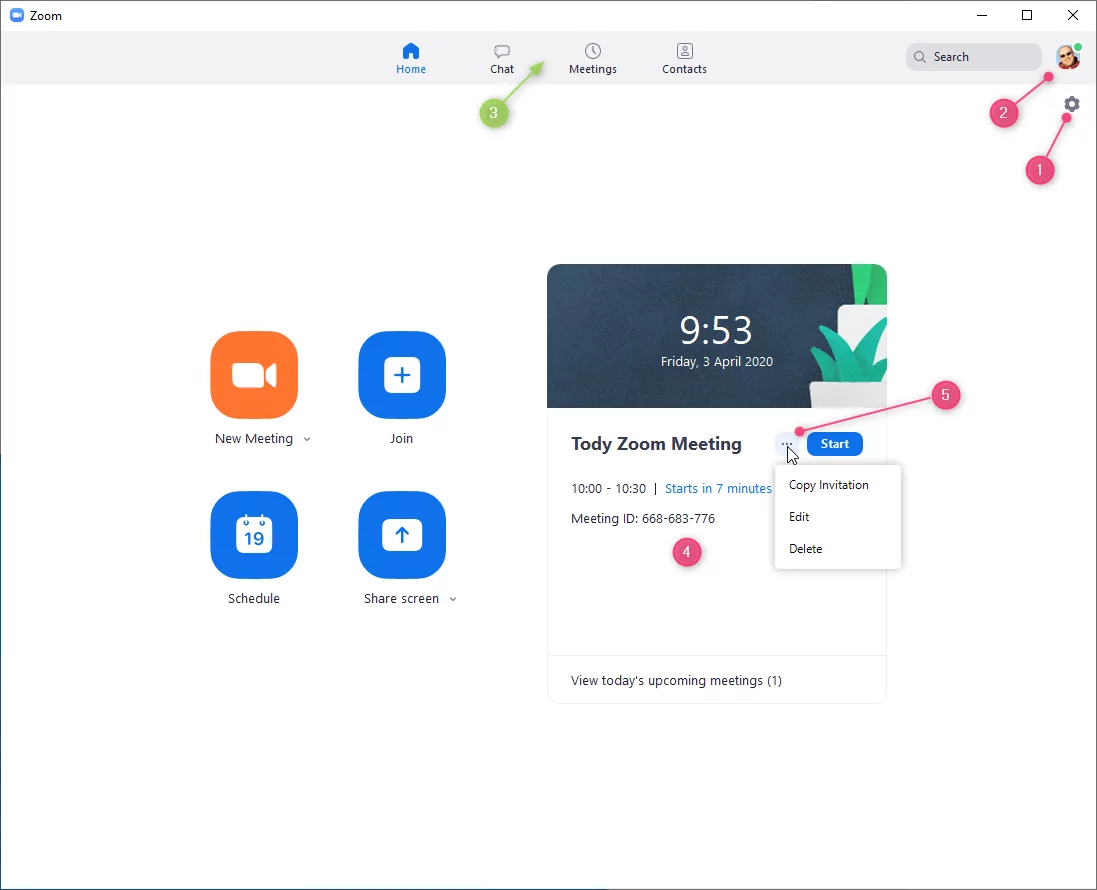
After the Zoom desktop client opens, you will be presented with Zoom’s main screen, the Home Tab, offering a unified view of the principal options to start with.
|
Options |
Description |
|
New Meeting |
Start an instant meeting. Click the downwards arrow for instant meeting options ( enable video or use your personal meeting ID (PMI) for instant meetings). |
|
Join |
Join a meeting using a meeting ID and your personal link name. You will have the option to start with or without the computer audio and video |
|
Schedule |
Quickly Set up and schedule a future meeting. Remember to set a meeting’s password (10 digits, not trivial ones as 1111..) or accept the generated password. Go to Advanced Options to enable Waiting Rooms and uncheck the “Automatically Record meeting on local computer” check box. |
|
Share Screen |
Share your screen in a Zoom Room by entering in the sharing key or meeting ID. Click the downwards arrow to allow the sharing of your computer sounds |
|
|
Upcoming Today Meetings : displays meetings scheduled for the current day that you host. This view only shows information from one meeting at a time and also offers short access to delete or edit the meeting before it starts (see ellipsis (5)). As a host, you also have the possibility to start a meeting instantly by clicking on (Start) |
|
|
Opens options to edit or delete the meeting and to copy the invitation text to forward it to further participants. This ellipsis is shown as long as the meeting is not started. |
|
|
Access the Settings of the Desktop Client, e.g. test your computer Audio and video an toi always show the Meetings Controls (Accessibility settings) |
|
|
Click on your Profile picture to access further options not related to the Zoom software itself, e.g. add a Personal Note, set a Current Status, or access your Profile’s settings . (see your Profile for more details) For private computer holders you can update your Zoom client over “Check for Updates”, for standard PSI computers this option has been disabled. |
|
|
Tab Bar to access other Zoom functionalities e.g. Chats, overview of the hosted Meetings (past and future, create and manage) |


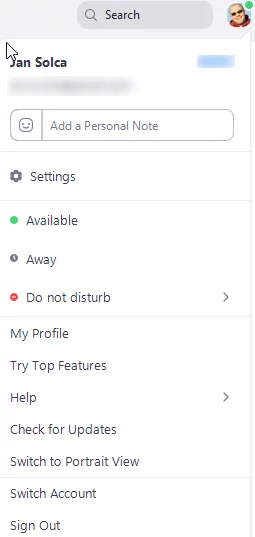
Accessing Profile’s Information and other Options
To access and edit your profile click on your profile picture 
Other Options are available over this menu such as change your Status or signing out of Zoom. At the top you will find beside your registered name and e-mail the current User License Type BASIC, PRO, LICENSED (our Education License)
|
Options |
Description |
|
Add Personal Note |
Specify a personal note appearing in your chat profile to anyone who hover over your profile picture. Only available for Windows MAc , iOS and Android. |
|
Settings |
Access the desktop client settings |
|
Status |
Change your current Status to Available, Away, or Do Not Disturb, a time period must be set. |
|
My Profile |
Open the Zoom web portal to customize your Zoom profile. In the case you do not currently have an associated picture with your Profile (Initials are shown) the link will be named “Change My Picture”, and change to “My Profile” as soon as a picture is uploaded. |
| Try Top Features | An external link to some features to get more of Zoom Meetings, such as the Virtual Background. Not recommended in those days were the Internet Bandwidth is under strong pressure. |
| Help | Opens an external page, the Zoom Help Center |
| Check for Updates | Update the Zoom Client, PSI standard Windows systems will get a dialog informing that this Update mechanism has been disabled |
| Switch to Portrait View | Switch the current Zoom window to a Portrait View, a narrower window. Use the same menu to switch back to the default Landscape View |
| Switch Account | Sign out and switch to another Account. Currently, not so different as signing out. |
| Sign Out | Sign out from the client and gets you back to the login screen |
Join a Meeting
Before joining a Zoom meeting on a computer or mobile device, you can download the Zoom App. Otherwise, you will be prompted to download and install Zoom when you click a join link received by e-mail or Microsoft Outlook invitation. Learn more about Joining a Meeting.
To join a meeting you must either possess a Zoom meeting link or the Zoom Meeting-ID and the associated password.
See also Join option in the Home screen Short Zoom Desktop Client Tour
Link to quickly Join a Meeting (PSI Zoom)
Schedule Meetings
Meetings can be scheduled as one-time or recurring meetings using either the Zoom Desktop or mobile app, or the Web browser by navigating to https://psich.zoom.us/start/videomeeting. Learn more about scheduling a Zoom meeting using the Web browser.
Desktop Client
As previously mentioned in Short Zoom Desktop Client Tour you can quickly Set up and schedule a future meeting by clicking on “Schedule” Icon in the Home screen.
To get a list of your scheduled meetings (created as a host) select in the Tab Bar ( 3 in the previous picture) the Meetings tab and select Upcoming sub-tab (4 in the figure below)
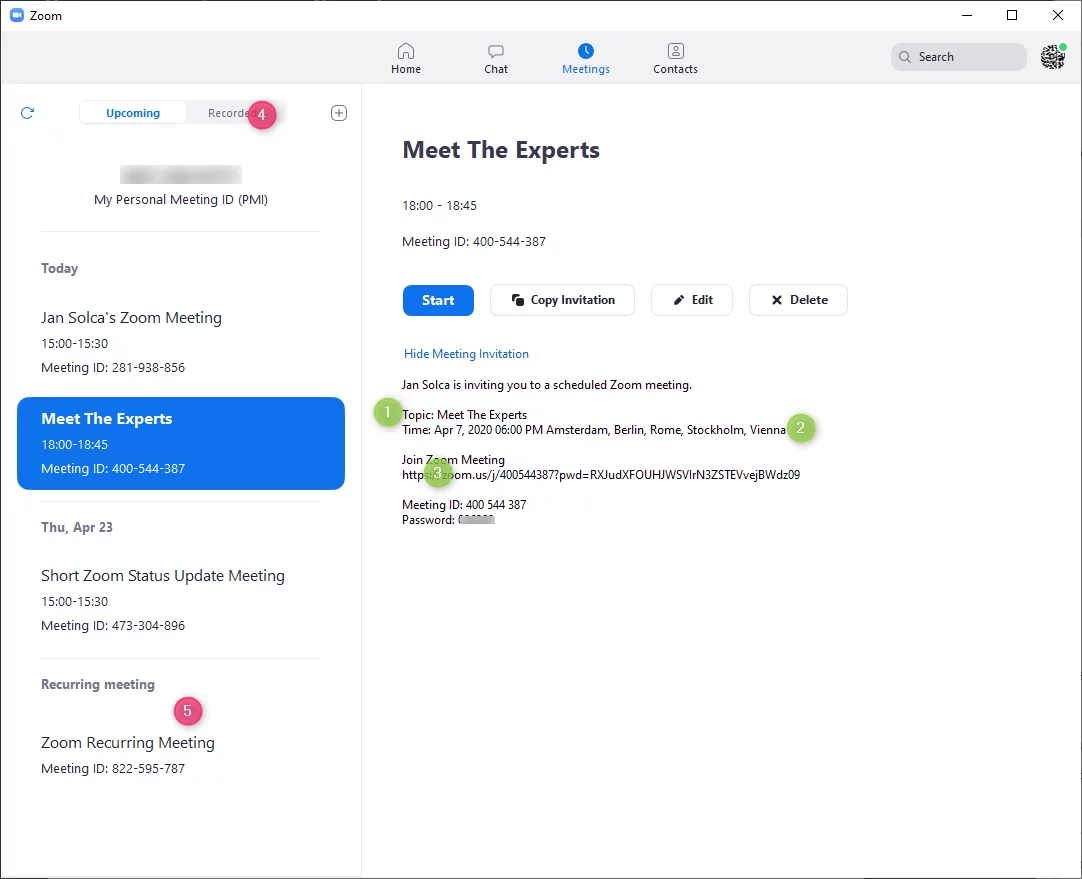
In the Meeting screen, you can view, manage, and schedule meetings.
|
Option |
Description |
|
|
Set up and schedule a future meeting (either using Desktop or Outlook Plugin) |
|
|
Refresh the meeting list if you don't see your scheduled meeting |
|
|
Start the selected scheduled meeting ( Upcoming tab) |
|
|
Copy the scheduled meeting's invitation text, allowing you to manually paste into an emai or Outlook Invitation. Click Show Meeting Invitation to view the meeting’s invitation |
|
|
Edit the meeting options of the selected scheduled meeting |
|
|
Permanently delete the selected scheduled meeting |


The Upcoming View  lists any one-time or recurring meetings that you have scheduled, or scheduled meetings for any users that you have scheduling privilege for[1] . As we also see the list is further divided into one-time and recurring meetings parts for a better readability.
By selecting a meeting, you can start or delete the meeting, edit its settings, or copy the meeting’s invitation.
Before sending an invitation please check the meeting‘s Topic, Schedule and Vanity URL or resp.  ,
,  and
and  (the correct PSI Vanity URL should be psich.zoom.us)
The Recorded View lists any previous meetings that you have recorded locally and see the file path of the recording. By hovering over a locally recorded meeting, you will have the option play the media file or open the containing folder.
Please be aware that you must not record any meetings without the consent of all participants and do not distribute any recordings without the consent of all participants.
Schedule a One-Time Meeting
Open the Zoom Client and sign in and hit the Schedule Icon

Or select the Meetings Tab and click on the Add  icon (see picture below), this will open a window to Schedule a Meeting. Editing to a later, before the meeting starts, is possible by selecting the meeting in the Upcoming View.

Please do not use schedule a meeting with Google Calendar since it presumes a Google Zoom authentication and is decommissioned in the future. “Schedule from Outlook” will open your local Outlook installation.
The next picture shows the different Settings of a Meeting, after you select “Schedule Meeting”
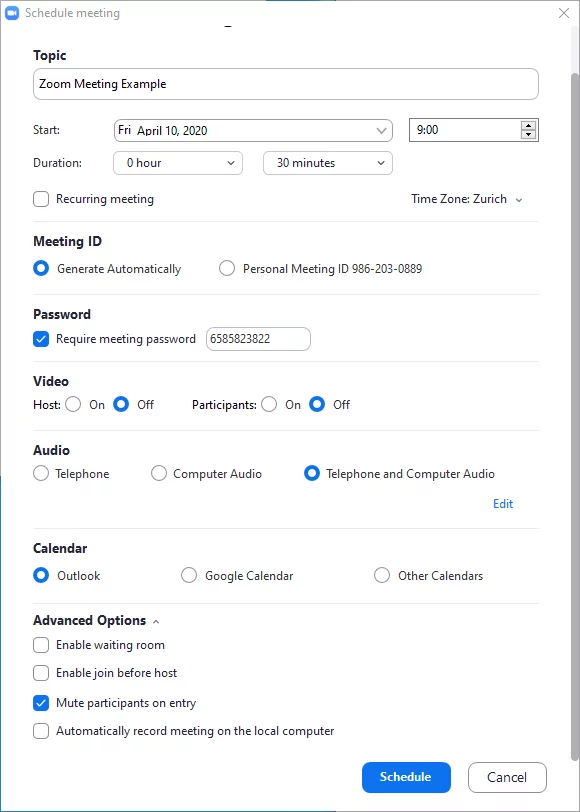
Most Settings are self-explanatory and will not be further discussed but the following settings should be taken care of in our best knowledge before sending out an invitation. To show the Advanced Options click on the arrow next to the label.
|
Options |
Description |
|
Time Zone |
By default, Zoom will use your computer's time zone. Click the drop-down menu to select Zurich as the time zone |
|
Recurring meetings |
Choose if you would like a recurring meeting (the meeting ID will remain the same for each session) and no Start or Duration can be entered |
|
Password |
ALWAYS set a password (max 10 digits) and do not overwrite the proposed password with a trivial one and check that it is 10 digits long |
|
Audio |
Choose whether to allow users to call in via Telephone only, Computer Audio only or Both. If Call In is not needed we recommend to only choose Computer Audio |
|
Calender |
any other choice than "Other Calendars" will require an integration with the type of calendar chosen, and a joining with Google account is about to be no longer supported |
|
Adv. Opt. - Record the meeting automatically |
NEVER check this setting to record the meeting automatically |
|
Adv. Opt.- Mute participants on entry |
If join before host is not enabled, this will mute participants as they join the meeting. Participants can unmute themselves after joining the meeting using the In-Meeting Controls |
|
|
finishes and opens the selected calendar service to add the meeting. Choosing “Other Calendars” allows you to copy and paste the scheduled meeting information such as date, time, and meeting URL into either an Outlook invitation or an e-mail |

Noteworthy:
- Scheduled meetings can be started at any time ahead of the scheduled time.
- The links will not expire or become invalid unless it is past the 30 days period for a non-recurring meeting or has been deleted from your Zoom account.
- An instant meeting link will expire as soon as the meeting is over.
- Meeting-IDs of recurring meetings expire 365 days after the meeting was last started.
- Recurring meetings cannot be scheduled with your Personal Meeting ID (PMI) since your PMI is reserved so that you can start or schedule a meeting at anytime
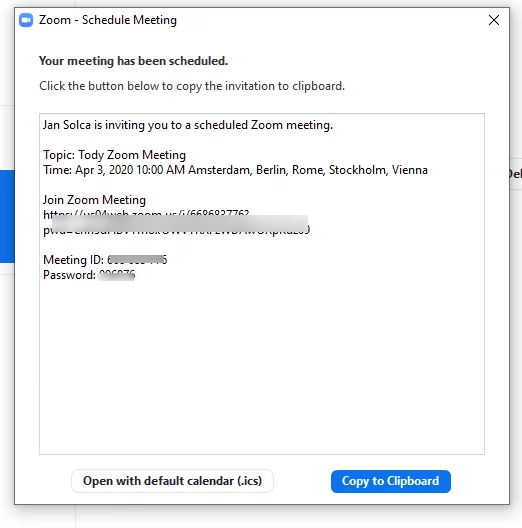
A typical “Other Calendars” invitation text is shown in the figure, generated by the Zoom Client after clicking on the “Schedule” button
Schedule a recurring Meeting
Zoom Software allows to schedule meetings with multiple occurrences, so that each occurrence uses the same meeting ID and settings. It is possible to schedule meetings in Daily, Weekly or Monthly increments.
Although, Zoom recommend to use the Outlook Add-in (desktop or web) for a better experience when using e.g Outlook as Calendar Service, we would like to emphasize that little feedback is currently available to the PSI Zoom team and we therefore ask you to be careful about its use, as well as be kindly to us when asking support ;-)
Steps to Schedule a Recurring Meeting
- Schedule a meeting (from the Home Tab or using the in the Meetings Tab)
- In the meeting settings check the recurring meeting option (Meeting’s date and time settings are now hidden)
- Choose either Outlook or Other Calendars as Calendar Service
- Click schedule to finish the settings
- How to complete the invitation will depend on the chosen Calendar Service
Please check Noteworthy : section for additional information on Zoom Meetings.
Outlook as Calendar Service
Important : No Outlook Add-In Required !
When Outlook is chosen as Calendar Service then Microsoft Outlook will open and display a pre-filled Meeting’s Invitation. At the contrary to the “Other Calendars” invitation text, the Outlook invitation text will be mostly the same for one-time and recurring meetings. In the picture below an example of such a recurring meeting invitation
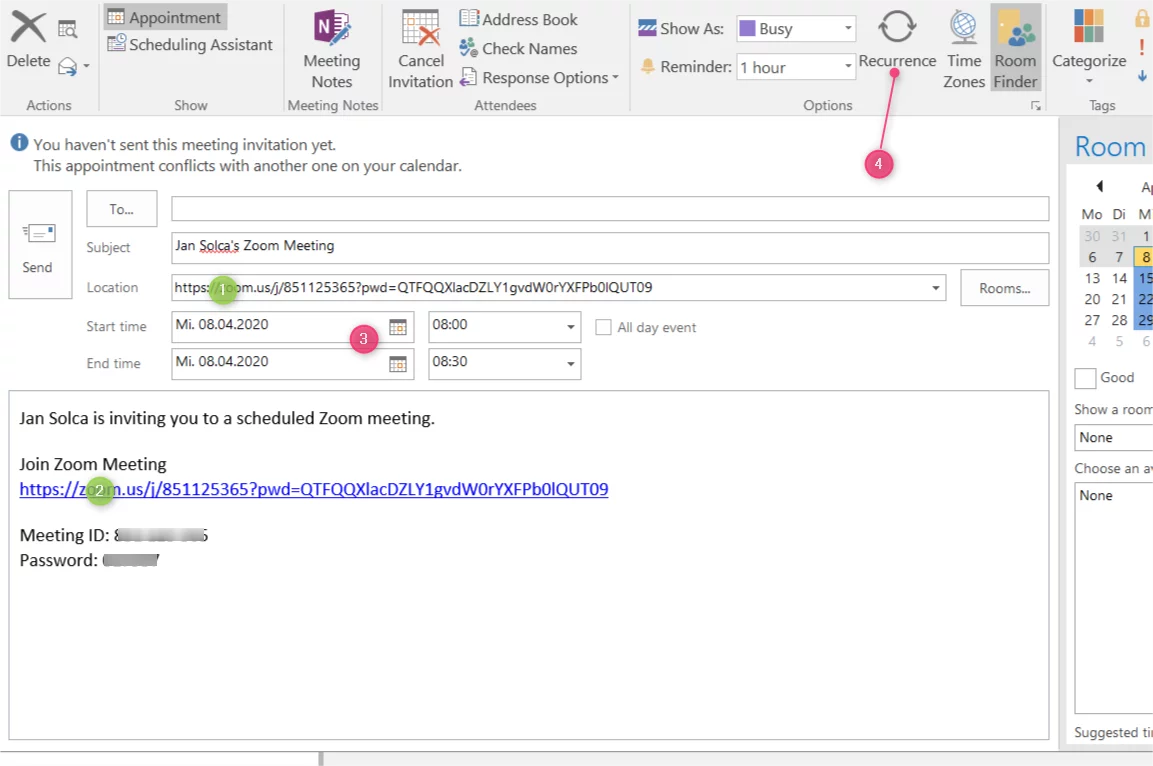
Before sending the invitation please check the following information
- Zoom vanity URL in
 and
and  should begin with https://psich.zoom.us/…
 - In the invitation text that a Meeting Password has been set
- Set the Meeting’s date and time

- Important : Click the Recurrence
 in the Outlook top bar to change recurrence settings
 - Define the attendees in the To.. field
- Click Send to finalize the invitation
Known Issues with the Outlook plugin
It has been observed that after installing the plugin and perhaps on first or second use DLL error messages will be raised and suddenly disappear after several opening and closing of the Microsoft Outlook application. We are still investigating the issue.
“Other Calendar” as Calendar Service
When “Other Calendar” is chosen as Calendar Service then a window will open with the invitation text as shown in the next picture
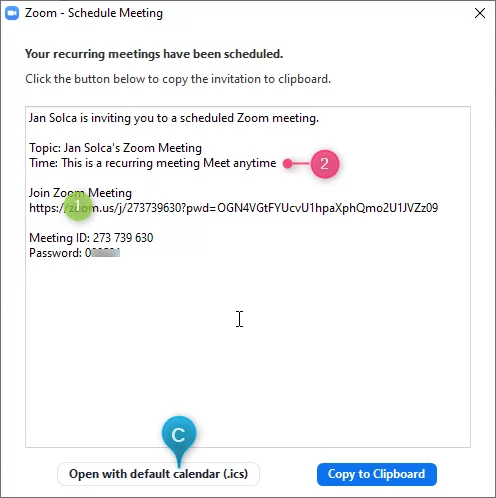
Before copying the invitation text please check the following information
- Zoom vanity URL in should begin with https://psich.zoom.us/…
- In the invitation text that a Meeting Password has been set
- As we see the Meeting Time text reflects the fact that this is a recurring meetings invitation

To finalize the recurring meeting’s invitation
- click on “Copy to Clipboard”
- .Open your Meeting Planning’s Tool, e.g. Outlook Calendar
- Paste the invitation text
- Set the recurrence information as well as the date and time the meeting should take place
- List of attendees
- And Send to complete the process
Clicking on “Open with default calendar (.ics)”  will add the Event to your current own calendar tool, e.g. Microsoft Outlook, Apple Calendar or Lightning (Thunderbird calendaring extension) and can be further shared with others.
In-Meeting controls
The in-meeting controls available to you depend on
- If you participate in a Zoom meeting organized by another user, you are considered a participant or
- If you have scheduled the meeting or if, for example, the host was unable to attend, you have been selected as a co-host. Further information on in-meeting controls for host and co-host.
Various roles are available for meeting chairs, co-hosts and alternative hosts and participants. Further information on roles in meetings.
Noteworthy:
- The in-meeting controls were changed with version 4.6.10 (April 7, 2020).
- Zoom removed the meeting ID from the title bar and
- Moved the Invite button to the bottom of the participant window.
- Introduction of a new security icon in the host's in-meeting controls
- Join a meeting quickly if you know the meeting ID and password. And
- To test your computer with audio and video and to familiarize yourself with Zoom Meeting as a participant, please navigate to https://psich.zoom.us/test to join a test meeting.
- If you are using a dual monitor setup, you can activate the "Use dual monitors" function to see the screen sharing on one monitor and the participants on the second.
- In-meeting chat content is not automatically saved and in-meeting file transfer is disabled in PSI. To share content with participants, use a personal or group chat.
Test computer audio and video
Wenn Sie an einem Meeting teilnehmen oder ein Meeting starten, haben Sie die Möglichkeit, Audio und Video Ihres Computers vorab zu testen, indem Sie auf „Lautsprecher und Mikrofon testen“ klicken.  .
.
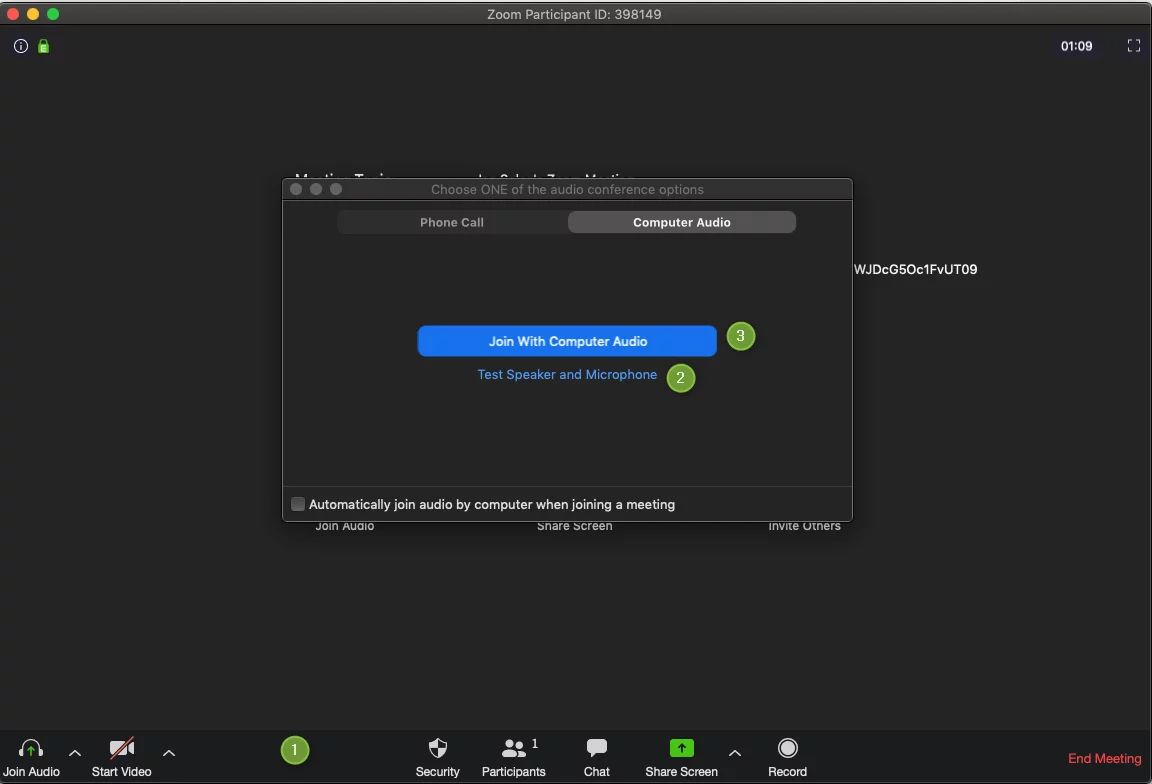
Klicken Sie auf "Mit Computer-Audio verbinden".  um an dem Meeting teilzunehmen oder es zu starten. Die In-Meeting Bedienelemente
  werden bereits am unteren Rand des Besprechungsfensters angezeigt.
Das folgende Bild zeigt die Besprechungsoberfläche aus Host-Sicht

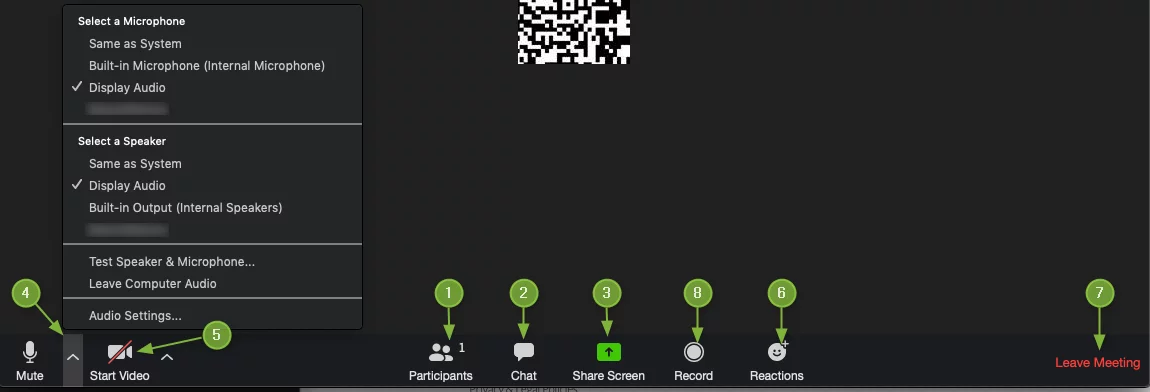
Control elements of a participant
|
Option |
Beschreibung |
|
|
Sehen Sie, wer gerade an der Besprechung teilnimmt [1] und laden Sie andere ein. Sie können weitere Teilnehmer direkt über die Registerkarte Kontakte einladen oder die URL oder Einladung in die Zwischenablage kopieren. |
|
|
Greifen Sie auf das Chat-Fenster in der Besprechung zu, um mit den Teilnehmern zu chatten. Erfahren Sie mehr über In-Meeting-Chat. Sie können Ihren Chat in der Besprechung während der Besprechung manuell in Ihrem Ordner "Dokumente" speichern. |
|
|
Teilen Sie Ihren Bildschirm, wenn der Host dies zulässt. Sie können den Desktop oder die Anwendung auswählen, die Sie freigeben möchten. Sie haben auch die Möglichkeit, ein Whiteboard, einen Teil des Bildschirms oder den Inhalt einer zweiten Kamera freizugeben (erweiterte Optionen). Weitere Informationen zum Teilen von Scree [2] n. Überprüfen Sie die Anmerkungen zu zwei Monitoren im Unterabschnitt Bemerkenswert. |
|
|
Schalten Sie Ihr Mikrofon stumm und wieder aktiv. Wenn Sie außerdem auf den ^ -Pfeil neben Stumm / Stummschaltung klicken, werden weitere Audiosteuerungen ausgelöst, um die Mikrofon- und Lautsprecherquelle zu ändern, die Zoom derzeit auf Ihrem Computer verwendet, Computer-Audio zu verlassen und auf die vollständigen Audioeinstellungen zuzugreifen.
Tipps:
|
|
|
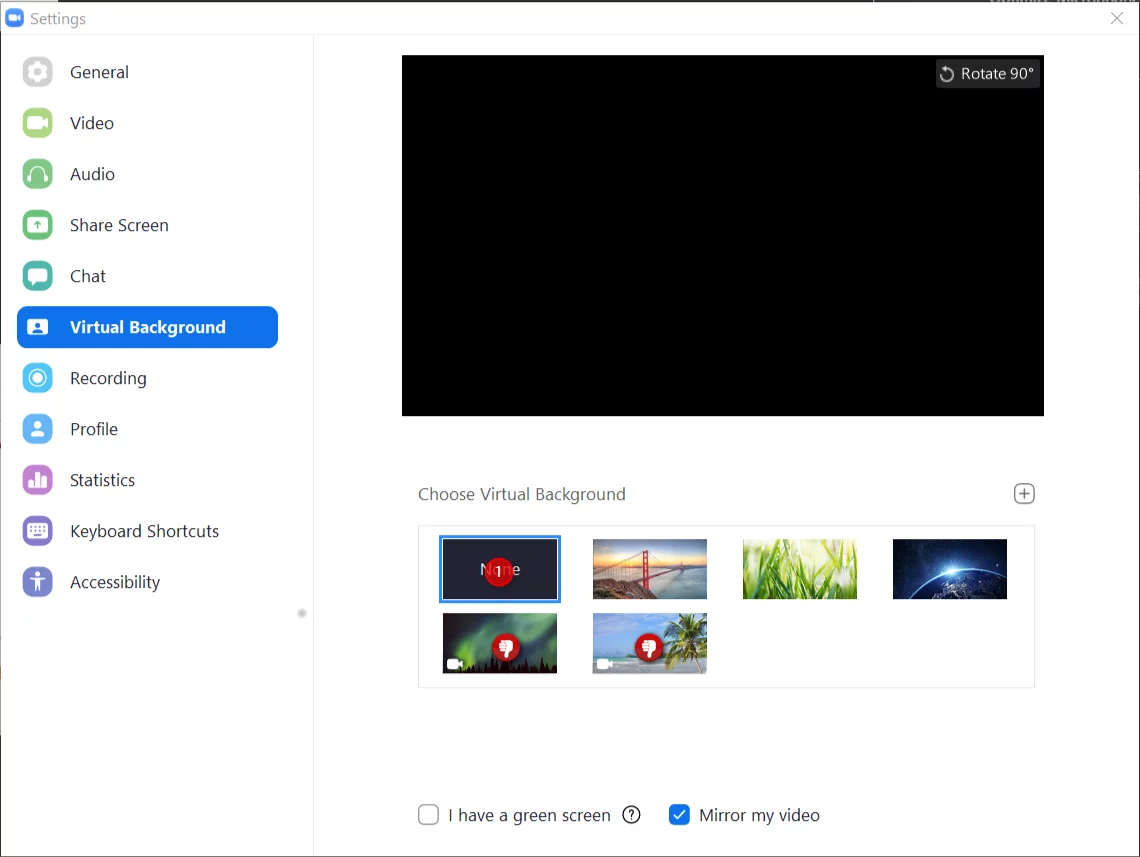
Schaltet die Kamera an/aus Klicken Sie weiter auf den ^ -Pfeil neben Start / Stop Video, um weitere oder vollständige Videoeinstellungen freizugeben. Der virtuelle Hintergrund (falls aktiviert) kann auch über dieses Menü geändert werden. |
|
|
Hinzufügen einer Besprechungsreaktion (nur Besprechungsteilnehmer) |
|
|
Verlassen Sie das Meeting, während es für die anderen Teilnehmer fortgesetzt wird. Nur der Gastgeber kann das Meeting beenden. |
|
|
Starten oder stoppen Sie eine lokale Aufzeichnung, wenn der Host dies zulässt. Aber: Bitte beachten Sie die rechtlichen Informationen zur Aufzeichnung von Sitzungen. Der Host steuert die Berechtigung zur lokalen Aufzeichnung von Sitzungen in seinen Kontoeinstellungen |
 Teilnehmer
 Chat
Chat  Bildchirm teilen
 Stumm / Stummschaltung aufheben
 Start /Stop Video
 Reaktionen
 Sitzung verlassen
 Aufnahme
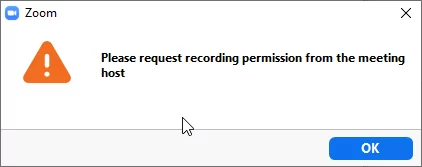
Die nächste Abbildung zeigt die Nachricht, die ein Teilnehmer erhält, wenn er versucht, die Sitzung ohne Erlaubnis des Hosts aufzuzeichnen
Host-In-Meeting controls(Co-Host)
Host controls allow you to control various aspects of the meeting, such as managing participants, enabling the recording of local sessions and launching polls. More information about roles in meetings.
Host controls allow you to control various aspects of the meeting, such as managing participants, enabling the recording of local sessions and launching polls. https://support.zoom.us/hc/en-us/articles/360040324512-Roles-in-a-meeting.

|
Option |
Beschreibung |
|
Stumm / Stummschaltung aufheben Video starten / stoppen |
Gleich wie für einen Teilnehmer |
|
|
Neue Funktion in der Version 4.6.10 (7. April 2020). Zugriff auf Sicherheitsoptionen in Besprechungen. |
|
|
Öffnet das Fenster, um Teilnehmer zu verwalten und andere zur Teilnahme an der Besprechung einzuladen. Im Teilnehmerfenster können Sie einen Teilnehmer zu einem Host oder Co-Host machen (sofern vom Administrator aktiviert) [1], wodurch das Wartezimmer des Meetings aktiviert und die Teilnehmer beim Eintritt stummgeschaltet werden (klicken Sie auf die Option "Mehr"). |
|
|
Entspricht dem Freigabebildschirm des Teilnehmers, jedoch einige zusätzliche Hosteinstellungen, wenn Sie auf den Pfeil ^ neben dem Freigabebildschirm klicken, z.B. Entscheiden Sie, wer den Bildschirm freigeben kann. Wenn Sie einen Bildschirm freigeben, werden die Steuerelemente oben auf dem Bildschirm angezeigt. Sie können sie jedoch an eine andere Stelle ziehen. |
|
|
Rufen Sie das Chat-Fenster auf, um mit den Teilnehmern zu chatten und zu steuern, mit wem die Teilnehmer des Meetings chatten dürfen. |
|
|
Dies beendet das Meeting für alle Teilnehmer. Wenn Sie die Besprechung fortsetzen möchten, sollten Sie einem anderen Teilnehmer die Kontrolle über den Host geben, bevor Sie die Besprechung verlassen. |
|
Aufnahme |
Starten oder stoppen Sie eine lokale Aufnahme. Bitte beachten Sie die rechtlichen Informationen zur Aufzeichnung von Sitzungen. Der Host steuert die Berechtigung zur lokalen Aufzeichnung von Sitzungen in seinen Kontoeinstellungen. |
 Sicherheit
 Teilnehmer
 Chat
Chat  Meeting beenden
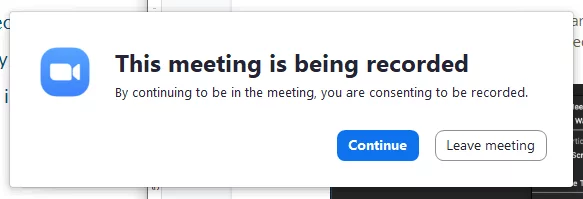
Die nächste Abbildung zeigt die Meldung, die auf jedem Teilnehmer angezeigt wird, wenn ein Host mit der Aufzeichnung der Sitzung beginnt. Der Teilnehmer hat dann die Wahl, die Besprechung zu verlassen oder in der Besprechung zu bleiben. Außerdem wird jedem Teilnehmer eine Audio-Nachricht über den Start / Stopp der Aufzeichnung gesendet.
Host, co-hosts and alternative hosts
The host can share hosting permissions with another user so that the co-host can manage the administrative side of the meeting, e.g. managing participants or starting/stopping the recording (moderator type). This functionality must be enabled for all members of your organization and can therefore only be enabled by an administrator.
Further information on assigning a co-host. There is no limit to the number of co-hosts you can have in a meeting. Co-hosts are assigned during a meeting and cannot start a meeting. If a host needs another person to start the meeting, they can assign an alternative host.
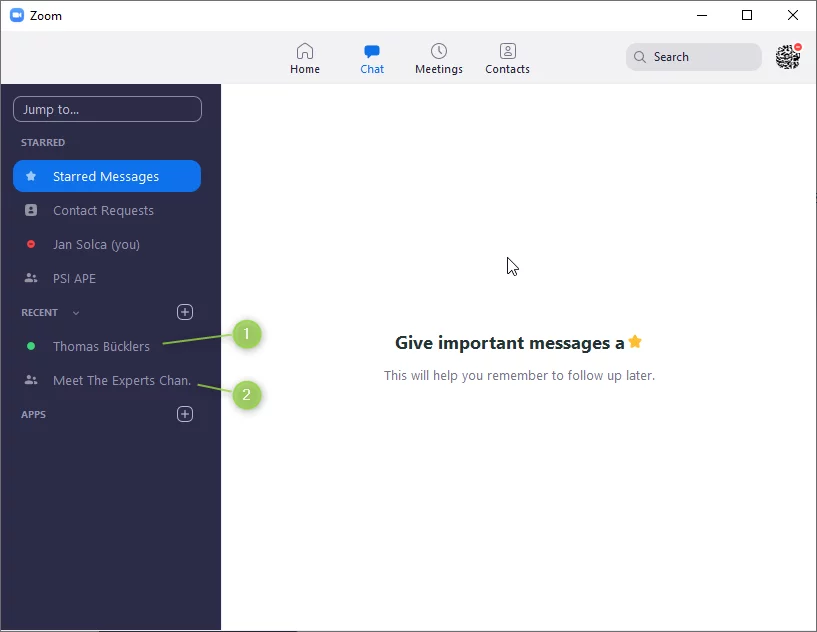
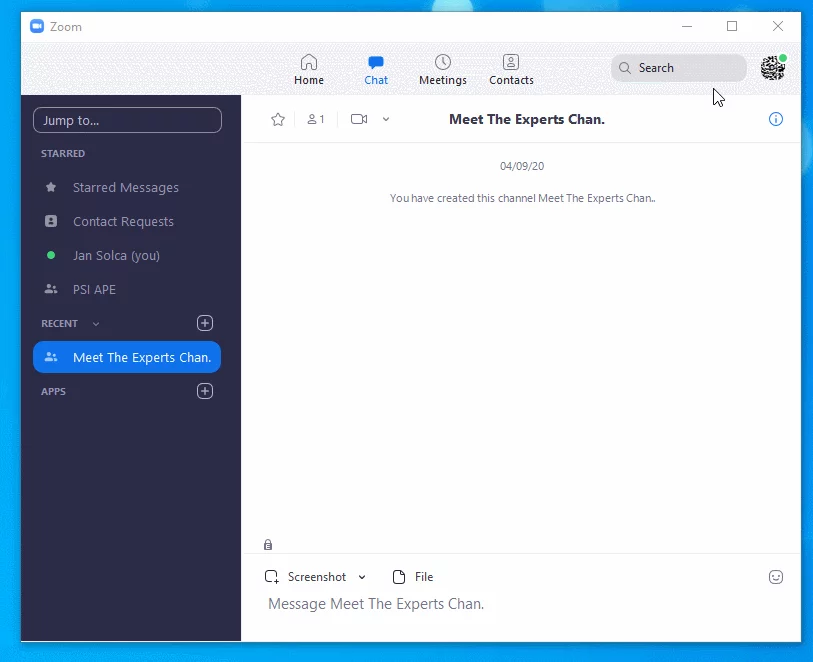
Using the chat
In the "Zoom client" tab, select the "Chat" option to display private conversations with your contacts or to group conversations with the name "Channels"
|
Option |
Beschreibung |
|
Springen zu ... |
Nach einem Kontakt oder Kanal suchen |
|
Markierte Nachrichten |
Anzeigen von Nachrichten, die Sie markiert haben, Kopie wichtiger Nachrichten |
|
Kontaktanfragen |
Listen Sie ausstehende Kontaktanfragen von externen Zoom-Benutzern auf |
|
Ihr Name |
Klicken Sie auf Ihren Namen, um Ihren persönlichen Chat-Bereich zum Speichern persönlicher Notizen, Screenshots und Speichern von Dateien zu verwenden, die nur für Sie sichtbar sind. |
|
|
Starten Sie einen neuen Chat mit einem persönlichen Kontakt, erstellen Sie einen Kanal oder treten Sie einem Kanal bei, d. H. Einer Gruppenkonversation, die auch Audio und Video unterstützt (siehe später). |
|
Neu |
Unter "Neu" sehen wir, dass bereits eine Chat- und eine Channel-Diskussion gestartet wurden
Klicken Sie einfach auf diese Namen, um den Chat-Verlauf anzuzeigen und die Diskussion fortzusetzen. |
|
Apps |
Wird am PSI nicht unterstützt. |
 informiert über den Kontaktstatus (grün ist verfügbar)
 hat das Gruppensymbol
  vor dem Namen
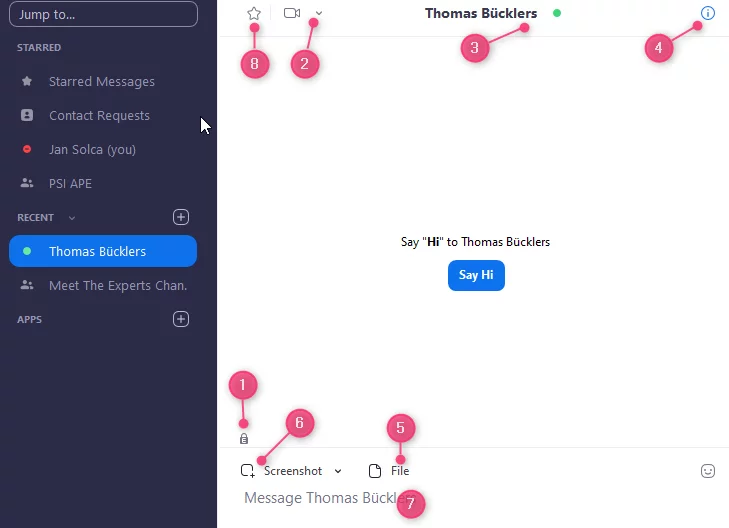
Wenn Sie im linken Bereich einen Kontakt oder einen Kanal auswählen, wird das Chat-Fenster angezeigt. Es bietet verschiedene Funktionen für die Interaktion und wird in der nächsten Abbildung detailliert dargestellt.
|
Option |
Beschreibung |
|
|
Ist der Chat von Ende zu Ende verschlüsselt? |
|
|
Startet eine Besprechung mit dem Kontakt. Wenn ein Kanal ausgewählt ist, wird eine Besprechung mit allen Mitgliedern des Kanals gestartet. |
|
|
Name und Status des Kontakts. Neues Fenstersymbol |
|
|
Zusätzliche Optionen für den Kontakt oder Kanal anzeigen. Ermöglicht außerdem den schnellen Zugriff auf Dateien, Bilder und markierte Nachrichten im ausgewählten Chat. |
|
|
Lokale Dateien freigeben |
|
|
Machen Sie Screenshots und senden Sie sie |
|
|
Nachrichtenfeld: Verfassen Sie Nachrichten und senden Sie sie an Ihren Kontakt oder Kanal. Sie können auch Screenshots, Dateien, Codefragmente und animierte GIFs senden. |
|
|
Fügen Sie den Kontakt oder Kanal zu Ihrer Favoritenliste hinzu, sodass Sie schnell auf diese Kontakte oder Kanäle zugreifen können. |


 Wenn Sie den Mauszeiger über den Kontakt- oder Kanalnamen bewegen, um dieses Symbol anzuzeigen und den ausgewählten Chat in einem neuen Fenster zu öffnen.


Gruppen- und Privatchat haben meist identische Funktionen.
Einen Kanal erstellen oder ihm beitreten
Zoomkanäle sind Gruppendiskussionen, die öffentlich oder privat sein können (nur eingeladene Mitglieder) und die das Teilen verschiedener Arten von Inhalten ermöglichen, z. B. Gruppenchat (Nachricht), Dateien, Bilder und Screenshots.
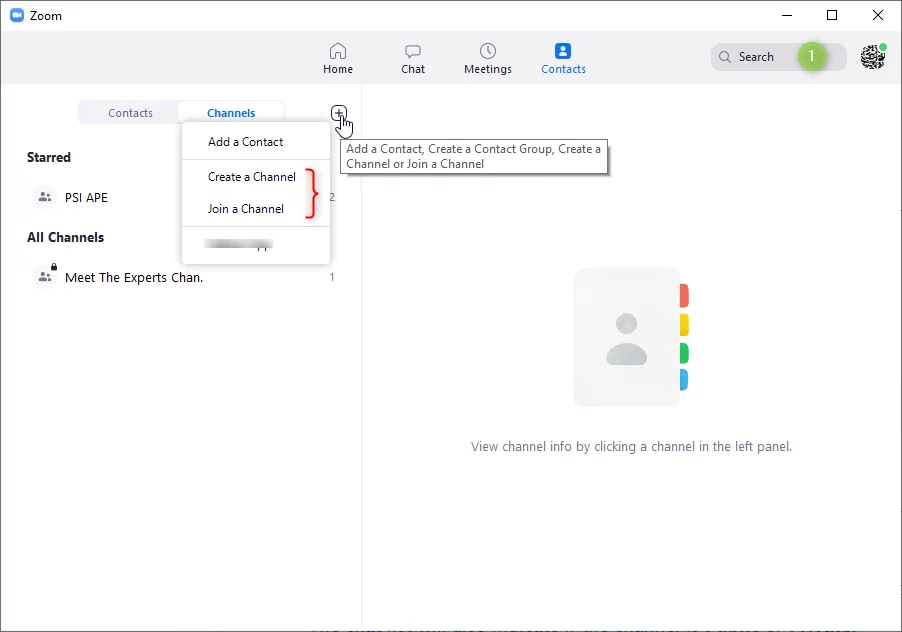
Das Erstellen oder Verbinden eines Kanals kann auf zwei Arten erfolgen. Entweder durch Klicken auf  Schaltfläche neben Zuletzt verwendet oder durch Wechseln zur Registerkarte Kontakt > Kanäle wie im Bild gezeigt. Verwenden Sie das Suchfeld
  um schneller nach einem Kanal oder Kontakt zu suchen
Create a channel step by step
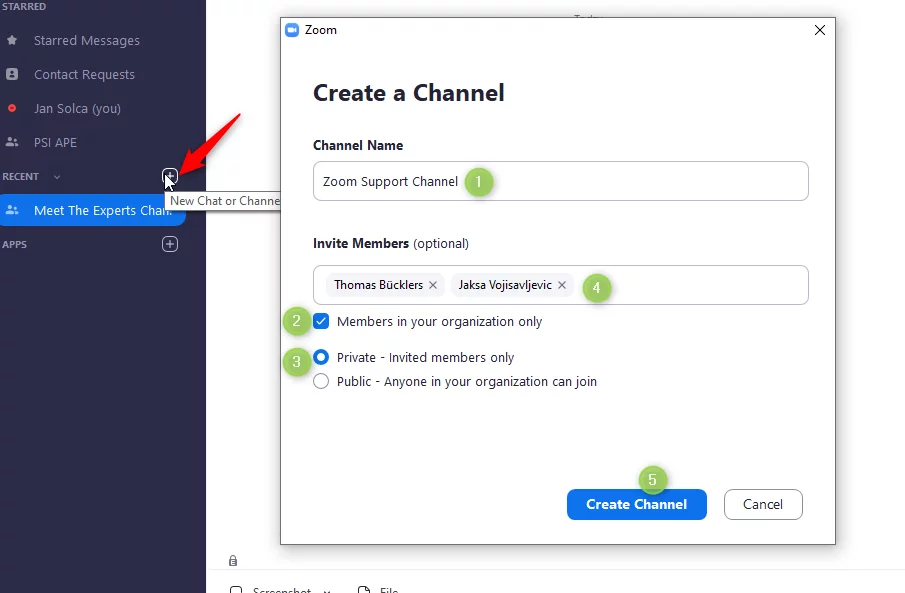
- Click on "Create channel".
- Follow the steps shown in the image
Using the group channel
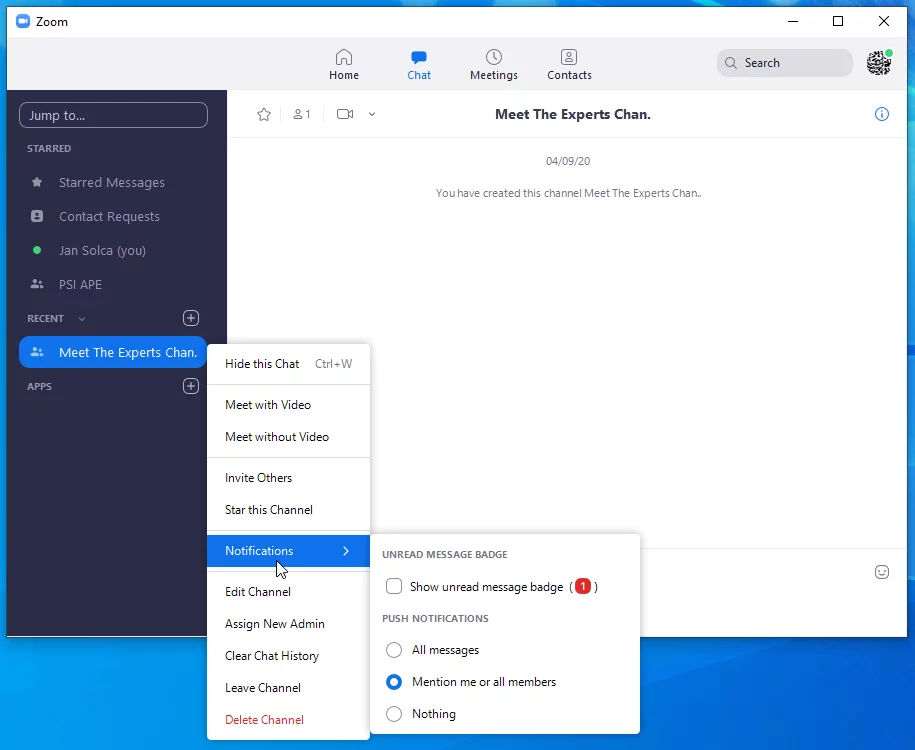
This image shows the various options available for a channel, e.g. starting an instant meeting with all channel members with or without video or inviting additional members.
How to quickly meet up with another contact
The chat makes it possible to meet a contact quickly and almost immediately and is shown in the next image
The Contacts tab
Select the Contacts tab to view and manage your contacts as well as the channels. In the company directory view, you can also start an audio or video conference immediately or be notified when the contact becomes available by selecting a contact and clicking on the corresponding icon.

- "Channels" tab: Display a list of channels. Selected channels are displayed at the top of the list.
- Company contacts: View a directory of all people registered with a psi.ch email address (licensed or not).
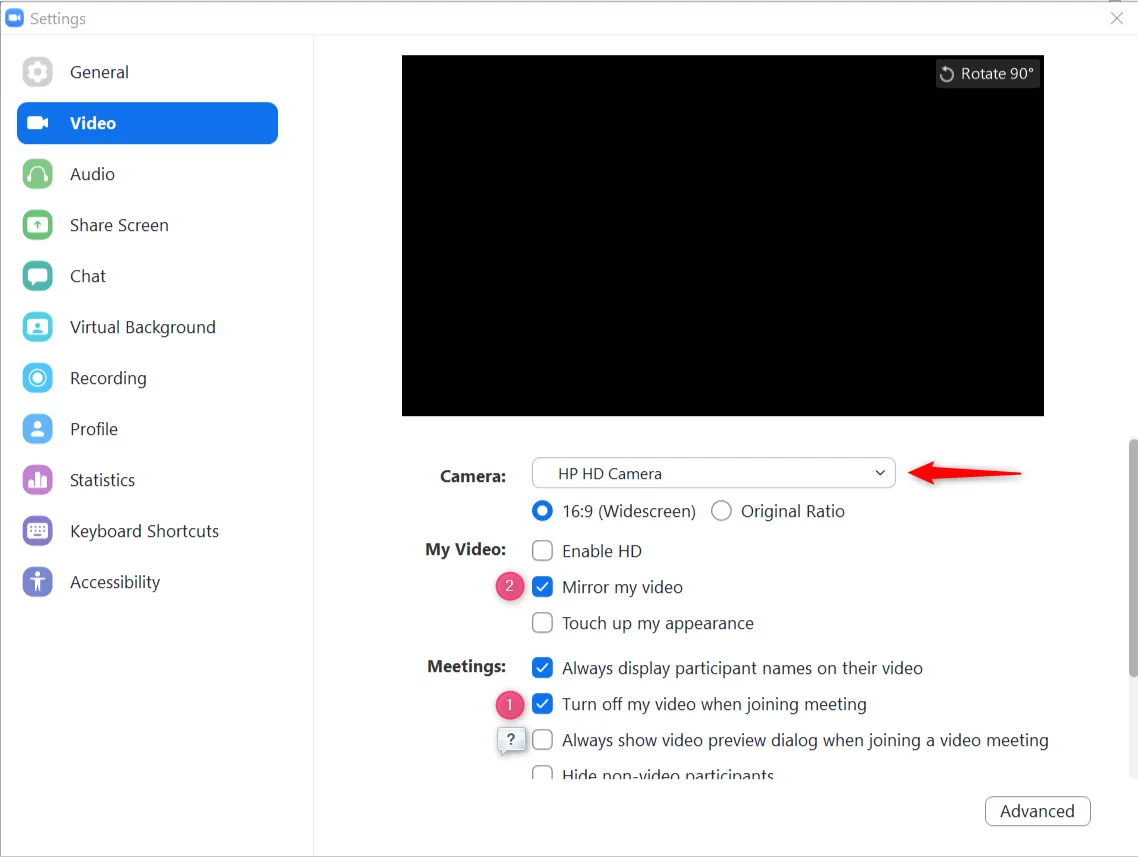
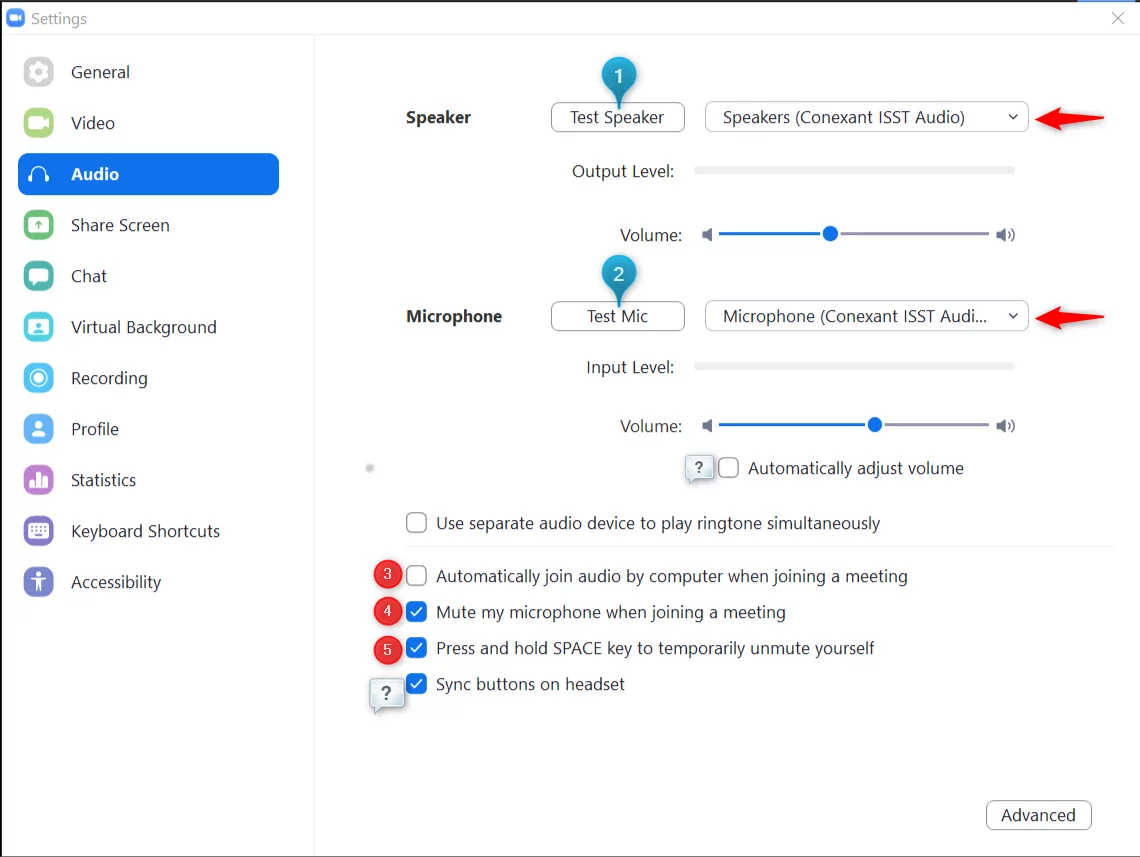
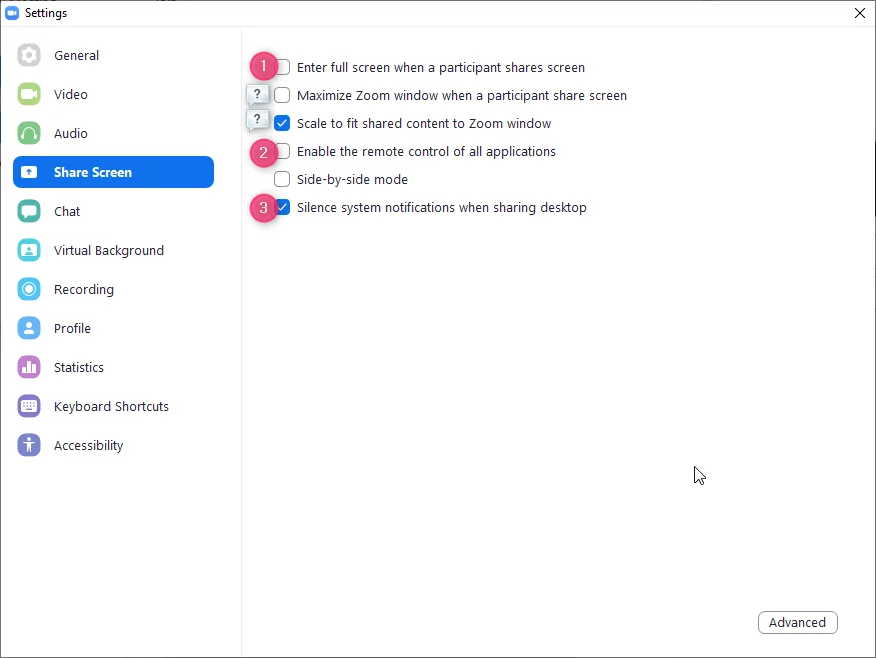
Recommended Zoom Desktop client settings
Open the software settings as described in Short Zoom Desktop Client Tour. In red some recommended settings and the question mark to show optional settings. Further information on settings in the desktop client or in the mobile app.

- There are no real recommended settings for the chat, except perhaps that you can set a "do not disturb" and play a sound when a new notification is received
- Leave everything deactivated in the Recording section
- In the Accessibility section, you can decide whether the in-meeting controls should always be displayed or not, and the chat font size
Android settings
It appears that some users are experiencing audio issues with Zoom on Android. In order for audio and video to work properly, you need to enable the "Auto connect audio" option in the global settings to automatically connect to audio over the internet when joining a meeting. More information about audio not working on mobile devices.
Video training material
- Info: Zoom How To Videos
- Training resources during the COVID-19 pandemic
- Zoom for education
- Zoom Video Tutorials
Avoid Zoombombing
As with many social media platforms, trolls exist, and this is also true for the Zoom platform. In recent days, a new form of trolling is appearing where a participant uses Zoom's screen sharing feature to interrupt meetings (and classes for those of you who teach using Zoom). This is known as Zoombombing. Trolls often manage to slip into meetings as a guest.
At this point in time (mid-April 2020), we recommend that our meeting leaders always set at least one meeting password to participate in meetings and activate the waiting room option.
Settings before the meetings
- Make sure that you are always using the latest version of the Zoom client
- Activate Waiting room (also available controls for security meetings). Note that an additional step is required to allow each participant
- Set a meeting password (at least at the individual meeting or user level). Use a strong password with at least eight characters and at least three of the following character types: Lowercase and uppercase letters, numbers and symbols. Each participant must enter the password to join meetings.
- Join by domain: Only authenticated users can join meetings
- Deactivate the Join before host option so that no participants can join the meeting before the host joins or without the host.
- Deactivate annotation: You and your participants can scribble and mark up content together using annotations during screen sharing. This can be deactivated in the Zoom web portal settings or in the meetings.
In-Meetings settings
- Use the new security option (v4.6.10) in the controls, here in action
- Lock the meeting, once it has started, no new participants can join
- Remove subscribers or put them on hold: Settings in the participants window
- Disable audio (mute) and / or video: Hosts can switch off audio / video from others
- Deactivate private chat: Restrict the ability of participants to chat with each other (In-Meeting Chat option).
- Do not allow participants to rename their ID: new security option
- Activate waiting room: New security option
- Control screen sharing: Hosts can deactivate screen sharing for participants. New security option and extended sharing options (screen sharing)
- Deactivate annotation: Go to the screen sharing option and select "Disable participant annotation".