

The purpose of this service is to offer PSI and external users access to remote desktops compute to particular beamline consoles, Merlin, Merlin7 and the Ra offline data analysis cluster. The access is provided via the NoMachine software or WebBrowser. Access has to be explicitly granted/configured by the respective Beamline Scientist / Administrator.
In case of problems and/or questions please open a ServiceNow ticket or contact nx@psi.ch.
Prerequisites
The following prerequisites must be fulfilled
- Active PSI_account (an e-account or DUO account is not sufficient). If you do not have such an account, please request it via your PSI contact person.
- Your account need to have MFA (multi factor authentication) enabled (https://www.psi.ch/en/computing/change-to-mfa)
IMPORTANT: During the authentication process you will have to provide your username/password. After entering the password you will get a PUSH notification to the MFA application (your mobile need to have Internet access for it to work!). You have to check the app and authorize your login attempt within 60 seconds. Due to technical reasons we are not able to display you a message regarding this procedure on the login screen.
- Your account need to be authorised / enabled to access certain remote desktops!
- If you want to access NX via the NX protocol on port 4000 you need to have the NX software installed on your PC/Laptop/Tablet. The NoMachine client software can be downloaded and installed for Windows, Mac, Linux, Android and iOS systems free of charge (PSI-Windows users: please use installation from software kiosk, do not install client from NoMachine). This is not needed if you access NX via web-browser.
Creating a connection from a remote host
Overview
There are two options to access the PSI NX service, access via the NoMachine Client and access via a web browser.
Access Via Browser
To access the PSI NoMachine service via web-browser, simply point it to https://nx.psi.ch . Afterwards you have to authenticate via username/password and verify the login via multi-factor-authentication (MFA). Select your target node to connect to and you will get the remote desktop directly in your browser window. (no additional software is required with this approach)
Access Via NoMachine Client
Set up a NoMachine connection to nx.psi.ch
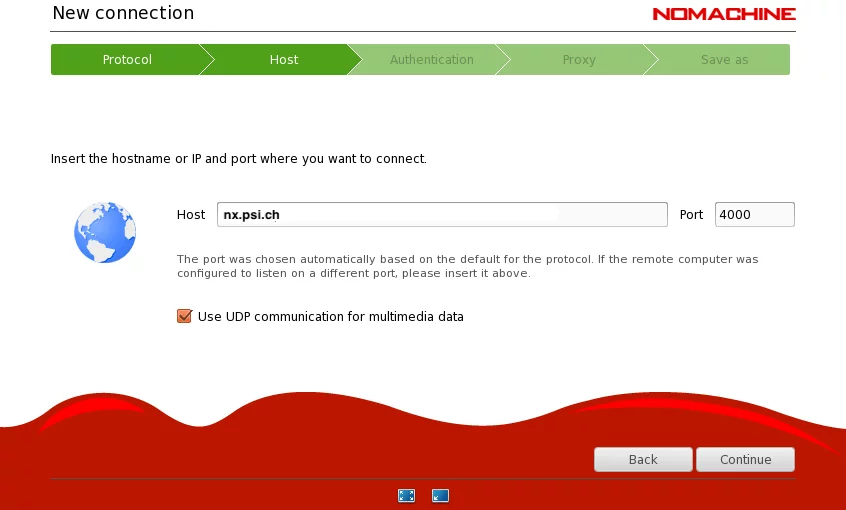
Start your NoMachine client, select New and then NX protocol

Specify the host name nx.psi.ch and leave the UDP flag ticked

Keep the default settings for HTTP proxy: most of the time the no-proxy option is correct. Contact your local system administrator if it does not work for your host:

Here define a meaningful name for the connection. This profile will later be used for all connections to the PSI network

In all future NoMachine sessions the following will be your starting screen.

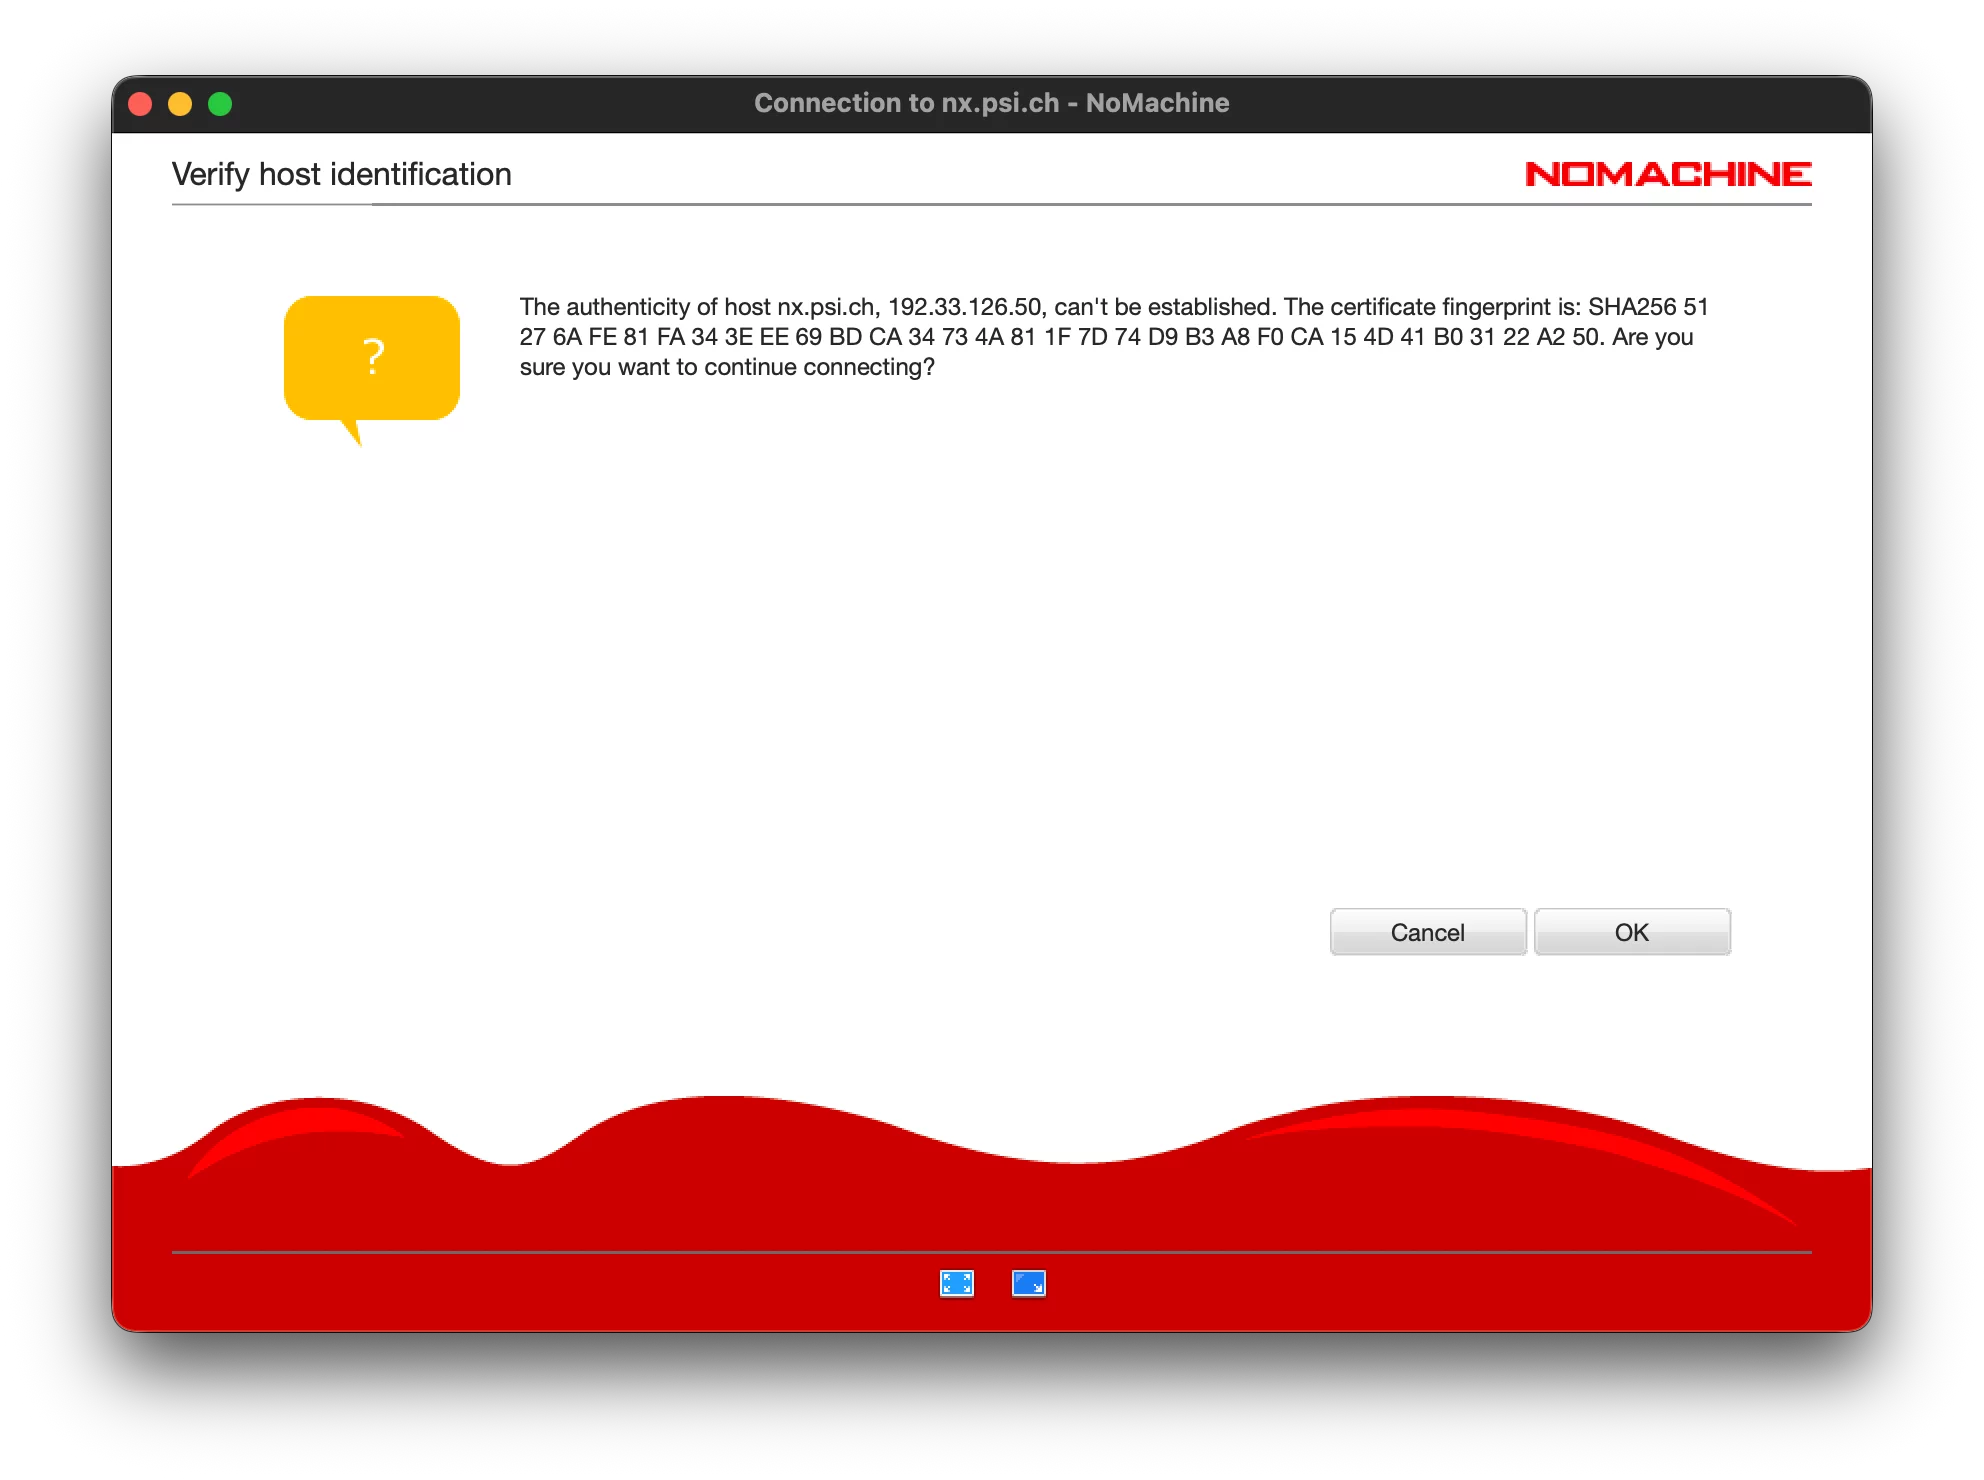
Choose your newly created profile and click the Connect button. At the first connection you will be asked to verify the fingerprint of the ssh certificate of nx.psi.ch. At the time of writing the correct key is:
51 27 6A FE 81 FA 34 3E EE 69 BD CA 34 73 4A 81 1F 7D 74 D9 B3 A8 F0 CA 15 4D 41 B0 31 22 A2 50
If you get the same string click "yes" to confirm.
Enter your PSI_account name and password. After submitting you will get a MFA push notification to your phone that you have to approve.


ctrl-alt-0 and in the display options)

Choosing the right connection
NoMachine offers two types of remote connections, physical and virtual desktops.
Physical desktops
Here you connect to a actual machine having a graphic card and connected monitors. You "see" the same displays as the person who sits in front of the physical computer. The session reacts to both mouse and keyboard connected locally and remotely. This behaviour can be configured, e.g. if a "view only" option is required.
Virtual Desktops (Linux only)
The virtual desktop functionality allows individual multiple Linux desktops to run independently on the same host. Each user has her/his own personal 'virtual' Linux desktop.
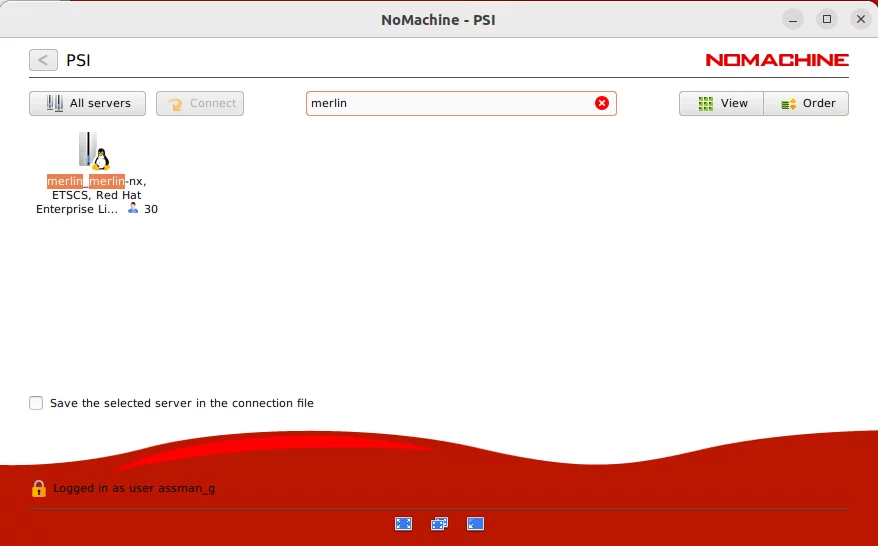
In the NoMachine client, you can choose which desktops to see. Initially you may see a lot of connections, both active and suspended, from all users who have access to the same hosts than you have. To avoid this clutter you can click on the "All desktops" Button and choose "My desktops" instead. Or you type a search expression in the input field "Find a user or a desktop"
Both type of desktops allow for desktop sharing by different users, which is useful for collaboration use cases. For virtual sessions, this requires that the original user acknowledges such a request for desktop sharing. For physical desktops, this will depend on the configuration settings of the host.
Multi Monitor Support
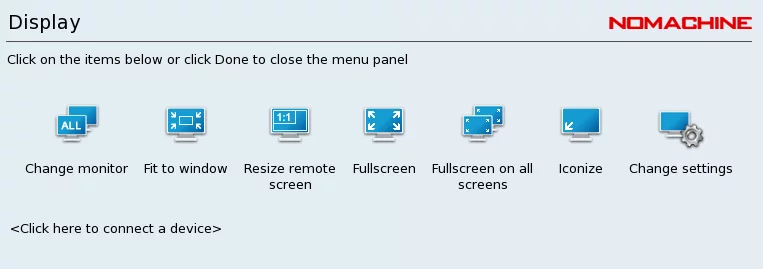
ctrl-alt-0 , choose display, then "Change Monitor" , select the screen(s) and finally confirm by hitting the "done" button 3 times

Disconnect (suspend) and Reconnect sessions
ctrl-alt-0 , choose "Connection" and hit the "disconnect" button. If you later start NoMachine, potentially from a different location, this session will appear in the list of "My desktops", from where you can re-connect.
Closing virtual desktops connections
Simply log out from the graphical session as you would do normally. It's recommended to close idle sessions.
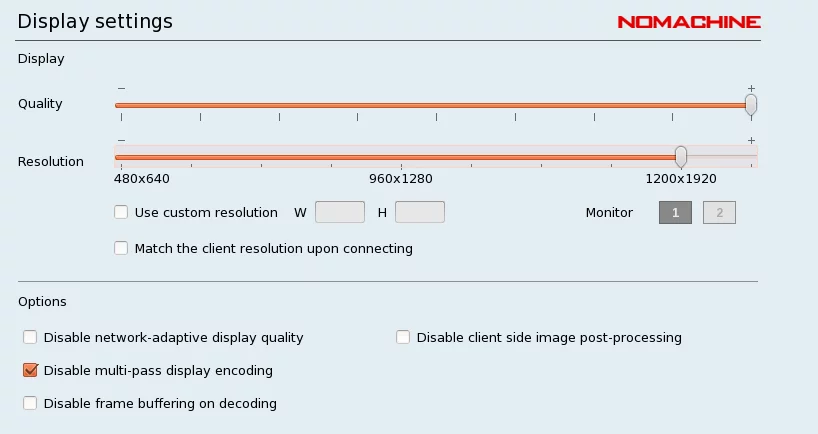
Improving image quality
ctrl-alt-0 -> display -> change settings and set quality (the upper bar) to 100 %. In addition you can tick the options "Disable multi-pass display encoding". See also NoMachine's Detailed description
Connection testing (still in preparation)
If you wish to test the procedures for remote access from your lab prior to your first remote access please contact your local contact who will arrange for access to a test machine. This will allow you to familiarize yourself with the NoMachine software as well as check the overall performance. The performance will depend mainly on the geographical distance from PSI and to a lesser extent on the available total network bandwidth of your internet connection.
Contact persons
- For access to beamline consoles and/or Ra cluster please contact the respective local contact of your beamline.
- In case of problems and/or question please open a ServiceNow ticket or write to nx@psi.ch.
Further manuals per beamline
Troubleshooting
I do not get a connection. Whats wrong ?
Please check all of the following:
- Do you have a valid PSI_account and did you use this for making the connection ? If not, get one (see above).
- Is your local firewall allowing connections to port 4000 (NX protocol) ? If your local or your institutes firewalls blocks such outgoing connections you can try to set up an ssh tunnel via hop.psi.ch (see below).
- Did you check with your PSI local contact that you are actually entitled to connect now ? Tthe access can depend on the date/time, e.g. for access to scheduled beamline resources.
- Do you have a recent version of the NoMachine client installed (>= version 6.X)
There are many connection icons - which should I choose ?
On some clients the information about the name of the target machine is not always displayed. Instead you will only see who is logged in, but you do not see which machine the person is connected to. Solution: upgrade to a newer Client Version 6.x . You can select to see only your own running connections by clicking the "All desktops" button and select "My Desktops". But this will display only running or suspended virtual sessions, that you own.
I do not see the icons, which allow me to connect to the physical desktops
Sometimes you will only see the virtual session icons. In this case hit the "Back" button in the lower right corner of the NoMachine client. This should bring you to a list of machines, including the physical desktops.
I do not see the name of the computer to which I want connect
The computer name is unfortunately only shown if you choose the option list view with the view button (instead of icon or compact view). The view button is in the upper left corner of the NoMachine connection dialog.
I get a "permissioned denied" error message
If you get the error message: "Cannot create session directory:/afs/psi.ch/user/m/meier/.nx Error is:permission denied" when connecting you have to create the .nx directory once manually by typing "mkdir .nx" in the home directory of your AFS account.
My firewall rule doesn't allow access to 4000 port (outbound)
Some networks do not allow outgoing connections on port 4000. In such cases you might want to to reach out to the network administrator/responsible to allow connections to nx.psi.ch on port 4000.
If this is not possible and/or feasible you can also reach nx.psi.ch via https/443. Therefore you can adapt your NX connection settings to use https/443 instead of 4000 and/or instead of configuring your NX Client just opening a browser at https://nx.psi.ch .